Friday, February 24, 2012

Finish It Friday: Wedding Quilt DONE!

Check it off the list, ladies and gents - - - Kate's Wedding Quilt is officially DONE!  Quilted, bound - even washed for crinkly deliciousness!


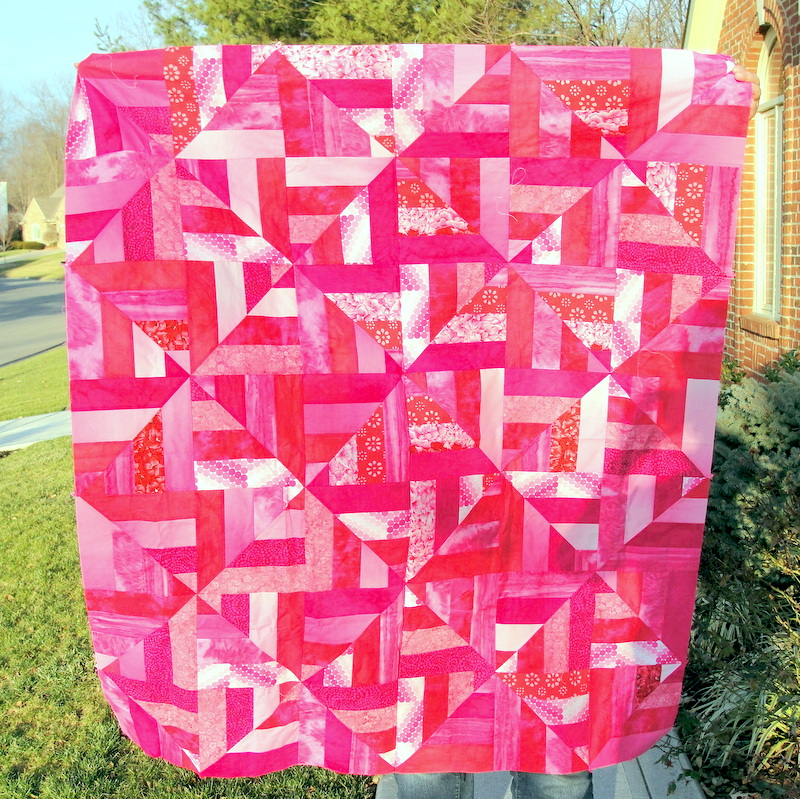
I quilted it with a wide meander, and bound it with (shocker) hot pink fabric. I went ahead and washed it because I don't want the recipients to feel like they can't use it. Wash it, dry it - use it!


Happy Stitching!!!!

Kelly

Wednesday, February 22, 2012

Swoon Quilt: Block #1

Ok, I caved in and am now officially "swooning" - - - and I LOVE IT!!!!!

If you haven't seen the pattern, the Swoon Quilt was designed by Camille Roskelley (pattern found here). There's even a Swoon-Along hosted on Flickr, so head over there for lots of photos of other folks' beautiful Swoons.

When I saw the Swoon Quilt in person at a Cincinnati Modern Quilt Guild Meeting (courtesy of Christy), I fell a lot in love. I just haven't been able to get it off my mind, I've been cyber-stalking other peoples' progress, I find myself thinking about it when I'm driving to work, I wonder why it hasn't called and asked me out to a sensible movie - - - all the signs of a quilt crush (and possibly a disturbed mind).

So, I finally caved and am on my way! You all should be very proud of me - I only bought the background fabric for this bad boy; all the rest came out of my stash. (I don't know why that's such a good thing, but it is, right?. . . . (right?)????)

My swoon-alicious fabrics!

All of the pieces cut for the first block...
And she's finished!


1 block down, 8 to go. I have to say, I was afraid I'd find this block to be SUPER tedious given that each large block has a total of 45 interior-blocks (and even more pieces if you count up all the HSTs and flying geese). But it's been really fun so far, and not tedious at all! The instructions are very clear and, so far, completely accurate.

So, I highly encourage you to start swooning with me, if you haven't started already. But be forewarned: Swooning is quite the time-suck. I've gotten nothing done AT ALL since starting this quilt. (And also, unfortunately, I don't care.)

Have you already started on your own Swoon quilt? I'd love to hear how you're getting along!

Happy Stitching (& Swooning),

Kelly

Wednesday, February 15, 2012

My First Online Swap!

I can't believe it's taken me so long, but I've finally joined an online block swap through Flickr. It's the NuBees Swap (click the button in the right side bar to see the photo stream). There are a ton of talented people involved, and it's really inspiring to see all the color combinations and amazing blocks that people are coming up with.

This is a month-by-month swap, so you don't have to commit yourself for an entire year, which for those of us who are terrified of committing to as much as a cable contract, it works perfectly!  :-)   Each participant gets to choose their color palette, but the maker chooses the fabrics and the pattern. At the end of the month, I'll mail each of my teammates a block, and I'll get one from each of them in my colors of choice (gray and white).

I'm making progress on this month's blocks. They're all cut out and the half-square triangles are made. Here's a preview:


And best yet - EVERYTHING CAME OUT OF MY STASH!!!!!!!!!!!  (I win.)

Happy Stitching!

Kelly

Thursday, February 9, 2012

Finish It Friday: Kate's Strip Twist Wedding Quilt


One of my absolute, all-time besties — otherwise know as Kate, K8 and sometimes Kate-Monster — got married over the summer and I just couldn't give my friend anything other than a quilt for the big event.

And I'm finally almost finished. 
Seven months after the fact.

I used the Strip Twist Pattern to make this red and pink quilt, and I really think it came together well. I love how the diamond shape pops out, but the block is really a square set straight, not on point. Check out the pattern link to see what I mean. 


Question: Have you ever given anyone pieces of a quilt as a gift, and then immediately taken it back so you could finish it? (I realllllly hope so, because that's totally what I did to Kate the day before her wedding. Gave her a present and then took it right back.)


I've gotta' tell y'all, this is a fantastic quilt to make with scraps, and it's really really fast and easy to make. For realz.


Next up: quilt and bind it! Hopefully I'll have some more pix soon of the absolutely finished, 100% done Kate Kwilt!


Happy Stitching,

Kelly

Thursday, January 26, 2012

Finish It Friday: Habitat Chevron Pillow

Woohoo! Another finish this week! And DUDES, this one's been sitting in the UFO stack for months now.

Several months ago, my Modern Quilt Guild had a challenge to make anything we wanted using Jay McCarroll's new "Habitat" fabric line.

So I decided to make 2 pillows. One was this one: The Clamshell Pile Pillow

And the other one is finally finished: The Habitat Chevron Pillow!


You all know I love a sensible chevron pattern, and I really like it with three gradating shades of aqua solid. I used the same fabrics in this pillow as I used in the Clamshell pillow - just a different design for interest on my amahzing and beloved crushed red velvet arm chair.

Happy Stitching!

Kelly

Monday, January 23, 2012

The stacks of unfinished stuff . . .

Seriously you guys, the UFO stack has gotten entirely out of control.

I have firmly resolved to whittle away at this stack...


and this stack...


and this stack...


and this wall of stuff...


over the course of the next year.

Chances are, I'll still start some new projects, but I'm looking forward to having a pile of DONES instead of a pile of UFOs at the end of the year!

What're you working on these days?

Happy Stitching!

Kelly

Saturday, January 21, 2012

My Singer 301 has a baby

I think I've blogged before about my sewing machine. I use a totally wonderful Singer 301 sewing machine. There's tons of info on this kind of machine available if you're interested in the full history, but in brief, the 301 was "born" in 1951/1952 to mark the 100th anniversary of the Singer Sewing Machine Company. It's a slant arm machine, meaning the needle is at an angle instead of straight up and down. This makes it easier to see what you're sewing, and it's also super strong - - that little angle in the needle let's you sew through some crazy thick material and layers.

By today's standards, there's nothing fancy about this machine. It's not particularly pretty, it doesn't have fancy stitches, and it's certainly not computerized like most modern machines. But, I have to tell you, I love it and I can't imagine sewing on another machine.

So you can imagine my UTTER JOY when I rounded a corner last night at the mammoth vintage/antique store only to discover that my 301 had a baby! A metal children's toy made to look just like my real machine. And it works - with a little hand crank, this baby will sew a chain stitch. What a toy!


Of course, it had to come home with me. It would have felt criminal to leave it there.
It seems I have a little collection starting  . . .

Happy Stitching!

Kelly

Friday, January 20, 2012

Finish It Friday: Curvy Mini Quilt

This little mini quilt started as a personal challenge to experiment with curved piecing. Ultimately, I found that curves are not that scary at all - I'll share a tutorial down the line. 

I also made a New Year's Resolution to finish up all of the UFOs (unfinished objects) in my sewing room before I start on anything new. We'll see how that goes, but baby steps, right?

For now, I'm here to reveal my big finish of the week—my Curvy Mini Quilt!

Before quilting:


and after quilting


I really do love a dense, straight line quilting design. 
It works particularly well, I think, to offset all of those circular bits.


This little gem is now brightening up my cube at work. And I feel more confident piecing curves. AND I finished a pesky UFO!


Happy Stitching!

Kelly

Wednesday, January 18, 2012

How To Make Half Square Triangles

Half square triangles, or HSTs as you'll sometimes see them called, are one of the most common building blocks in quilting. HSTs are extremely versatile and offer a lot of design potential in your quilting projects. With a bunch of HSTs you can make a chevron quilt (like this one), a diamond design, or a scrappier layout ( and many others) just by simply twisting and turning the blocks. They're also a "gateway block" - - - HSTs are just a step away from quarter square triangles and loads of other quilty potential!


Measuring Note: One finished HST will measure approximately 1/4" x 1/4" smaller than the square you began with. For example, if you start with 3" squares, one HST will be approximately 2.75" square. I recommend starting with squares approximately 1/2" larger than you need you unfinished HSTs to be, and then trimming the HSTs to the desired size. Because it's so much easier to trim down than to rip out and try again if you seam allowance is off!)


There are several different ways to make HSTs, but this is my favorite method - - - two for the price of one!

And away we go...


To make one half square triangle, cut two squares the same size from contrasting/coordinating fabrics.


On the wrong side of one square, draw a diagonal pencil line from corner to corner.


Place the two squares right sides together with the pencil line facing up. Using the edge of a 1/4" presser foot as a guide, stitch the squares together by sewing 1/4" on either side of the drawn line.


Cut along the drawn line.


Press each side open and there you have it - - - two half square triangles!


Happy Stitching!

Kelly

Friday, January 13, 2012

How To Make Color Block Cookies

Ok, these cookies are just the absolute PRETTIEST! Plus, they taste delicious to boot, and they've brought a little rainbow into a day that (at least in Ohio) is frozen tundra-esque. (Seriously, penguins wouldn't stay here in this.)

Anyway, my friend Bethany sent me a link earlier today with this totally hilarious recipe, which inspired me to do some of my own experimenting with butter, sugar and food coloring.

I've been growing more and more enamored with color blocking, and it occurred to me to try and make color blocked cookies. I think it worked really well, and I was amazed that the cookies stayed the same bright, brilliant colors through the baking process. 

Set a little time aside to make these, but know that they're really not difficult at all - just ever so slightly time consuming. I also bet you could use ready made sugar cookie dough and just color it, but I haven't tried it myself. Just think of the colorful possibilities!!!


Posted by Picasa

The short story: 

  1. Mix a batch of your favorite sugar cookie dough. 
  2. Divide into sections and add a different color of food coloring to each section. Mix thoroughly and then refrigerate dough for about an hour. 
  3. On a thoroughly floured surface, place the lumps of colorful dough right next to each other. Squish them together a bit, and then roll the dough out. As you do so, make sure the different colors meld together. 
  4. Use a glass or other cookie cutter to cut out the cookies, trying to get a few different colors in each cookie. 
  5. Place them on a cookie sheet and bake, following your cookie recipe instructions. 
  6. As soon as you remove them from the oven, sprinkle the cookies with a clear, edible sugar glitter. Allow to cool and enjoy!


Happy stitching (and baking!)


---Kelly